How To Install A Snow Fence
The Tenax Heavy Duty Snow Fence is a cost-effective, high-performing solution to snowdrift containment, creating snowdrifts where desired while blocking extreme winds. Reliably protecting buildings, schools, and roads from extreme weather conditions, this snow fence is an investment in safety conditions for pedestrians, drivers, and property. The snow fence functions by decreasing the velocity of the wind as it strikes the fence and passes through the mesh openings. This causes the wind to drop snow on the downside of the fence. The specially designed polyethylene mesh boasts wind resistance, UV resistance, rust resistance, recyclability, and reusability. Tenax Snow Fence features long-lasting color that allows drivers and pedestrians to have better visibility as they travel in inclement weather. Tenax budget-friendly snow fence is lightweight and easy to install, move, and store during off-seasons, maintaining high rigidity due to its incredible design.

Applications:
- Used To Reduce Wind Speed
- Used To Increase Visibility For Drivers
- Provides A Strong Barrier Against Drifting Snow
- Protects Buildings, Schools, And Roads From Snow
- Ideal For Parking Lots, Airports, And Industrial Facilities
- Highly Effective In Both Commercial And Residential Applications
Features:
- High Tensile Strength
- Wind And UV Resistant
- Recyclable And Reusable
- Designed For High Rigidity
- Long-Lasting Color For High Visibility
- Good Porosity Factor For Storing Snow
- Simple And Effective Mesh Reduces Wind Speed
- Lightweight And Easy To Install, Move, And Store
- Available In Several Colors: Black, Green, And Orange
- Shop Tenax Heavy-Duty Snow Fence Here!
Creating A Layout
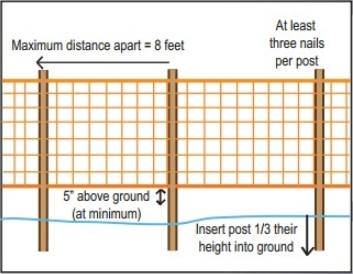
For ideal installation, netting should be placed 65 ft. away from the area that needs to be kept clear of snow. Install posts in a zigzag pattern with metal or wood supporting posts every 6 ft. Snow fence should be attached on the upwind side of the thicker wooden post so it will blow against the post. This prevents the wind from tearing when the wind whips against the post. Use at least three nails for each post to prevent the fence from slipping up and down the post. Insert the post 1/3 of its height into the ground. Place the posts no more than 8 ft. apart.
Installing The Fence Netting
Install the net slightly raised from the ground for better performance. Pull the fence taut and nail the smaller wooden post to the upwind side. Fasten the net to the support structure with plastic ties placed every 1 ft. on metal posts and with nails or metal staples on wood fences. For additional security, plastic cable is commonly used, simply lace the cable through the apertures in the top and bottom edges of the fence.
Connecting Fence Sections
To connect fence sections, overlap the two adjoining ends by at least 6 ft. and weave through the overlapping ends and secure the ties. Tenax snow fence can be left up all year as a windbreaker.
Wooden Posts
Wooden posts allow certain flexibility that is important for breaking wind. We do not recommend the use of metal posts to secure the plastic snow fence. Generally, snow fence should be 12 ft. upwind of the desired snow drift area. The fence should be sandwiched between two wooden posts, starting at a minimum of 5 ft. above ground. The higher the snow fence is above the ground, the further away the drift will develop. We do not recommend placing your fence higher than 2 ft. above the ground. If the fence is placed directly on the ground, it will be buried in the snowdrift.
Contact Us
If you have questions about selecting the right snow fence or installation techniques or need additional information about our products, our expert team is here to help! We are committed to providing excellent customer service and ensuring you have all the resources you need for a successful Snow Fence installation that will survive even the harshest winters. Contact Us today!
Contact Us